When cleaning your home the ‘natural’ way it can become confusing as to what to use, when to use it and how…in this article I will give really simple ways to clean various types of floors from tile, natural stone, laminate, wood/bamboo and vinyl. Each type of floor has its own quirks and as always, if in doubt about something, try in a small spot first before doing the whole floor.
First up the basics that you will need:
Liquid Castile Soap (how to make)
Hot/Warm Water
Mop (your choice of type)
Optional: Spray bottle if you use the micro cloth type ‘mop’
Essential Oils (tea tree, lavender, lemon, eucalyptus)
Recipes for Natural Spray Cleaner (floors, counters, etc.)
OF NOTE: if you use citrus essential oils it is essential that you do NOT use them on any type of vinyl flooring as citrus oils will eventually break down the petroleum based flooring. Also, please note that I do NOT include orange essential oil, this seems to really break down any type of petroleum based flooring very quickly.
OF NOTE: do not use Castile soap on waxed wood flooring unless you intend on ‘waxing’ them again in the future. Safe to use on ‘sealed’ floors.
To start, ALWAYS sweep/dust mop your floor well to eliminate as much dust, dirt, etc. on the floor to make cleaning it easier.
On all TYPES of flooring (except for waxed wood floors) simply put 1/8 of a cup per gallon of water of the liquid castile soap (made from my recipe which is very concentrated). If desired, add 40 drops of tea tree, lavender, lemon or eucalyptus essential oil. Stir this well in your kitchen sink or bucket. Damp mop only especially with wood, laminate or bamboo flooring. A wet floor of any type can be a hazard so use wring that mop out well…but with wood, laminate and bamboo too much water left to ‘dry’ will eventually cause problems. If you really want to be extra careful use an old towel to dry the floor.
This will work on tile, marble and natural stone floors…just remember to follow manufactures instructions on properly SEALING your natural stone floors as needed to keep them looking new!
If you have a micro mop/swifter type mop use as you would normally use but instead of using the commercial brand sprays see this Liquid Castile Spray recipe for direction on making your cleaner. You will use a damp pad or towel (I have been know to use those cheapie wash rags you can get from Walmart for use with my ‘swifter’. Be sure to change out as needed. I typically change ‘pads’ out after using one for about a 50 square foot area just to keep from spreading dirt around .
Alternatively I found this on Mamatron for laminate, tile and vinyl flooring:
(DO NOT USE ON WOOD, BAMBOO or STONE FLOORS)
How to Make Your Own Homemade (DIY) ‘Pergo’ Laminate Flooring Cleaner
To a measuring cup or jar, add the following:
• 1 part Water
• 1 part White Vinegar
• 1 part 70% Isopropyl (Rubbing) Alcohol
• Few drops of liquid dish detergent
Mix all ingredients together and pour into a fine mist spray bottle.
How to Use Homemade (DIY) ‘Pergo’ Laminate Flooring Cleaner
1. Sweep or vacuum your floors first
2. Spray the cleaner in a fine mist, low over the surface area to be cleaned
3. Allow to set for a few minutes, then use a microfiber mop or towel to wipe it up.
You’ll notice right away that this mixture cleans effectively and with ease, dries quickly, and it is so simple to use. NO BUCKET REQUIRED!
When you have finished mopping, just toss the microfiber mop head or towel into the laundry until next time. Do not use fabric softners with your microfiber mop heads…stops them from absorbing water!
I also found this on TipNut for harwood floors and have used on my own natural stone floors. REMEMBER when using vinegar on natural flooring to always follow up with damp mop clear water just in case. I have edited amounts based upon previous experience with vinegar on natural flooring. BE SURE TO DRY THE FLOOR (WOOD).
Here are several different recipes for mixing up your own cleaners for hardwood flooring, just a few simple ingredients are all that’s needed. Keep in mind that a little goes a long way, you just need enough liquid to dampen the mop (or cloth) and scrub away.
If you’re happy to damp mop with straight water, try adding about 10 drops of essential oil per gallon of water for extra cleaning muscle. Some suggestions: lavender, tea tree oil, pine or eucalyptus oil will add antiseptic qualities.
You’ll also find tips on this page for removing scuff marks, how to test for wax (and remove it), a few DIY polish recipes and a scratch repair method that may surprise you.
Getting Started: Sweep or vacuum surface to remove as much dirt and dust as possible.
Directions:
• When using one of the recipes below, damp mop only. Saturating the floor with liquid may cause spotting or warping of the surface. You can either lightly spray one section at a time or lightly spray the mop head.
• Scrub in the direction of the grain of the wood to grab and remove as much of the dirt as possible.
• Wipe dry with a soft cloth after washing.
Mix 1 gallon warm water with your choice of the ingredients below…
Solution #1
• 1/8 cup vinegar
• 1 TBS Castile liquid soap
Solution #2
• 1/2 cup white household vinegar (*Is it safe to use? See notes below)
Solution #3
• 1/4 cup borax
• 1/2 teaspoon liquid Castile soap
Solution #4
• 1/2 cup vinegar
• 10 drops essential oil of choice
Solution #5
• 1/8 cup liquid Castile soap
• 1/4 cup vinegar
Solution #6
• 1 TBS liquid Castile soap
• 1/8 cup vinegar
• 1/4 cup brewed black tea
Tea Mixture:
Steep 1 bag of tea in 2 cups of boiling water and leave until it comes to room temperature. Remove tea bag and soak cloth in liquid, wring out then wipe floor clean. Dry with a soft cloth. The tannic acid in the tea will help bring wood to a shine.
For Oil-Finish: Damp mop with straight water after first cleaning with the recipe below.
• 1 TBS rubbing alcohol
• 2/3 cup hot water
*Is vinegar safe to use? Isn’t it too acidic for hardwood?
If you poured a bottle of vinegar directly on the floor and allowed it to sit, it would most likely damage the surface. However, in the mixtures above it is well diluted and only used as a damp mop (meaning excess liquid is squeezed out). Vinegar is an excellent household cleaner and brings a lot of muscle to the job. If you’re concerned about the effects it may have on the finish over the long-term, consider doing a clear water rinse after wiping floor with a mixture that has vinegar as an ingredient (then wipe dry as usual).
Removing Scuff Marks
• Keep a spray bottle with a mixture of 50/50 vinegar, water and about 15 drops of essential oil of your choosing.
• Sprinkle scuffs with baking soda then spray solution, let fizz for a few seconds.
• Scrub marks until they are removed then dry with a soft towel.
Wax Testing & Removal
• Wet your fingers with water then flick into a corner of the floor where there’s not much traffic. If there’s wax on the surface, the floor will turn white under the water beads (may take a half hour or so to turn white).
To Remove Wax:
• Scrub the surface with mineral spirits using a household sponge with a nylon scrubby side. Wipe dry with a soft cloth as wax is dissolved. Repeat process a second time if needed.
DIY Polish
Wash surface as usual and dry thoroughly. Using one of the mixes below, apply polish to surface then wipe dry with a soft cotton towel.
Recipe #1
• Mix equal parts olive oil and white household vinegar.
Recipe #2
• 1/4 cup vegetable oil (or olive oil)
• 2 TBS cider vinegar
• 3 TBS vodka
Recipe #3
• 1 TBS olive oil mixed with 1 tsp lemon juice. Apply to a clean, dry mop and treat floors after cleaning.
Quick Tip: You can also spray commercial furniture polish onto the mop head and then wipe over surface.
Scratch Repair
• Rub a crayon that is the same color as the flooring into the scratch, filling the space as full of the wax as you can.
• To seal in place, heat with a hair dryer to soften the wax, allow to cool for a few seconds then buff with a soft cloth.
Lots of different ways to get the job done and many can be used to clean walls, cabinets and other items in your house…have fun!

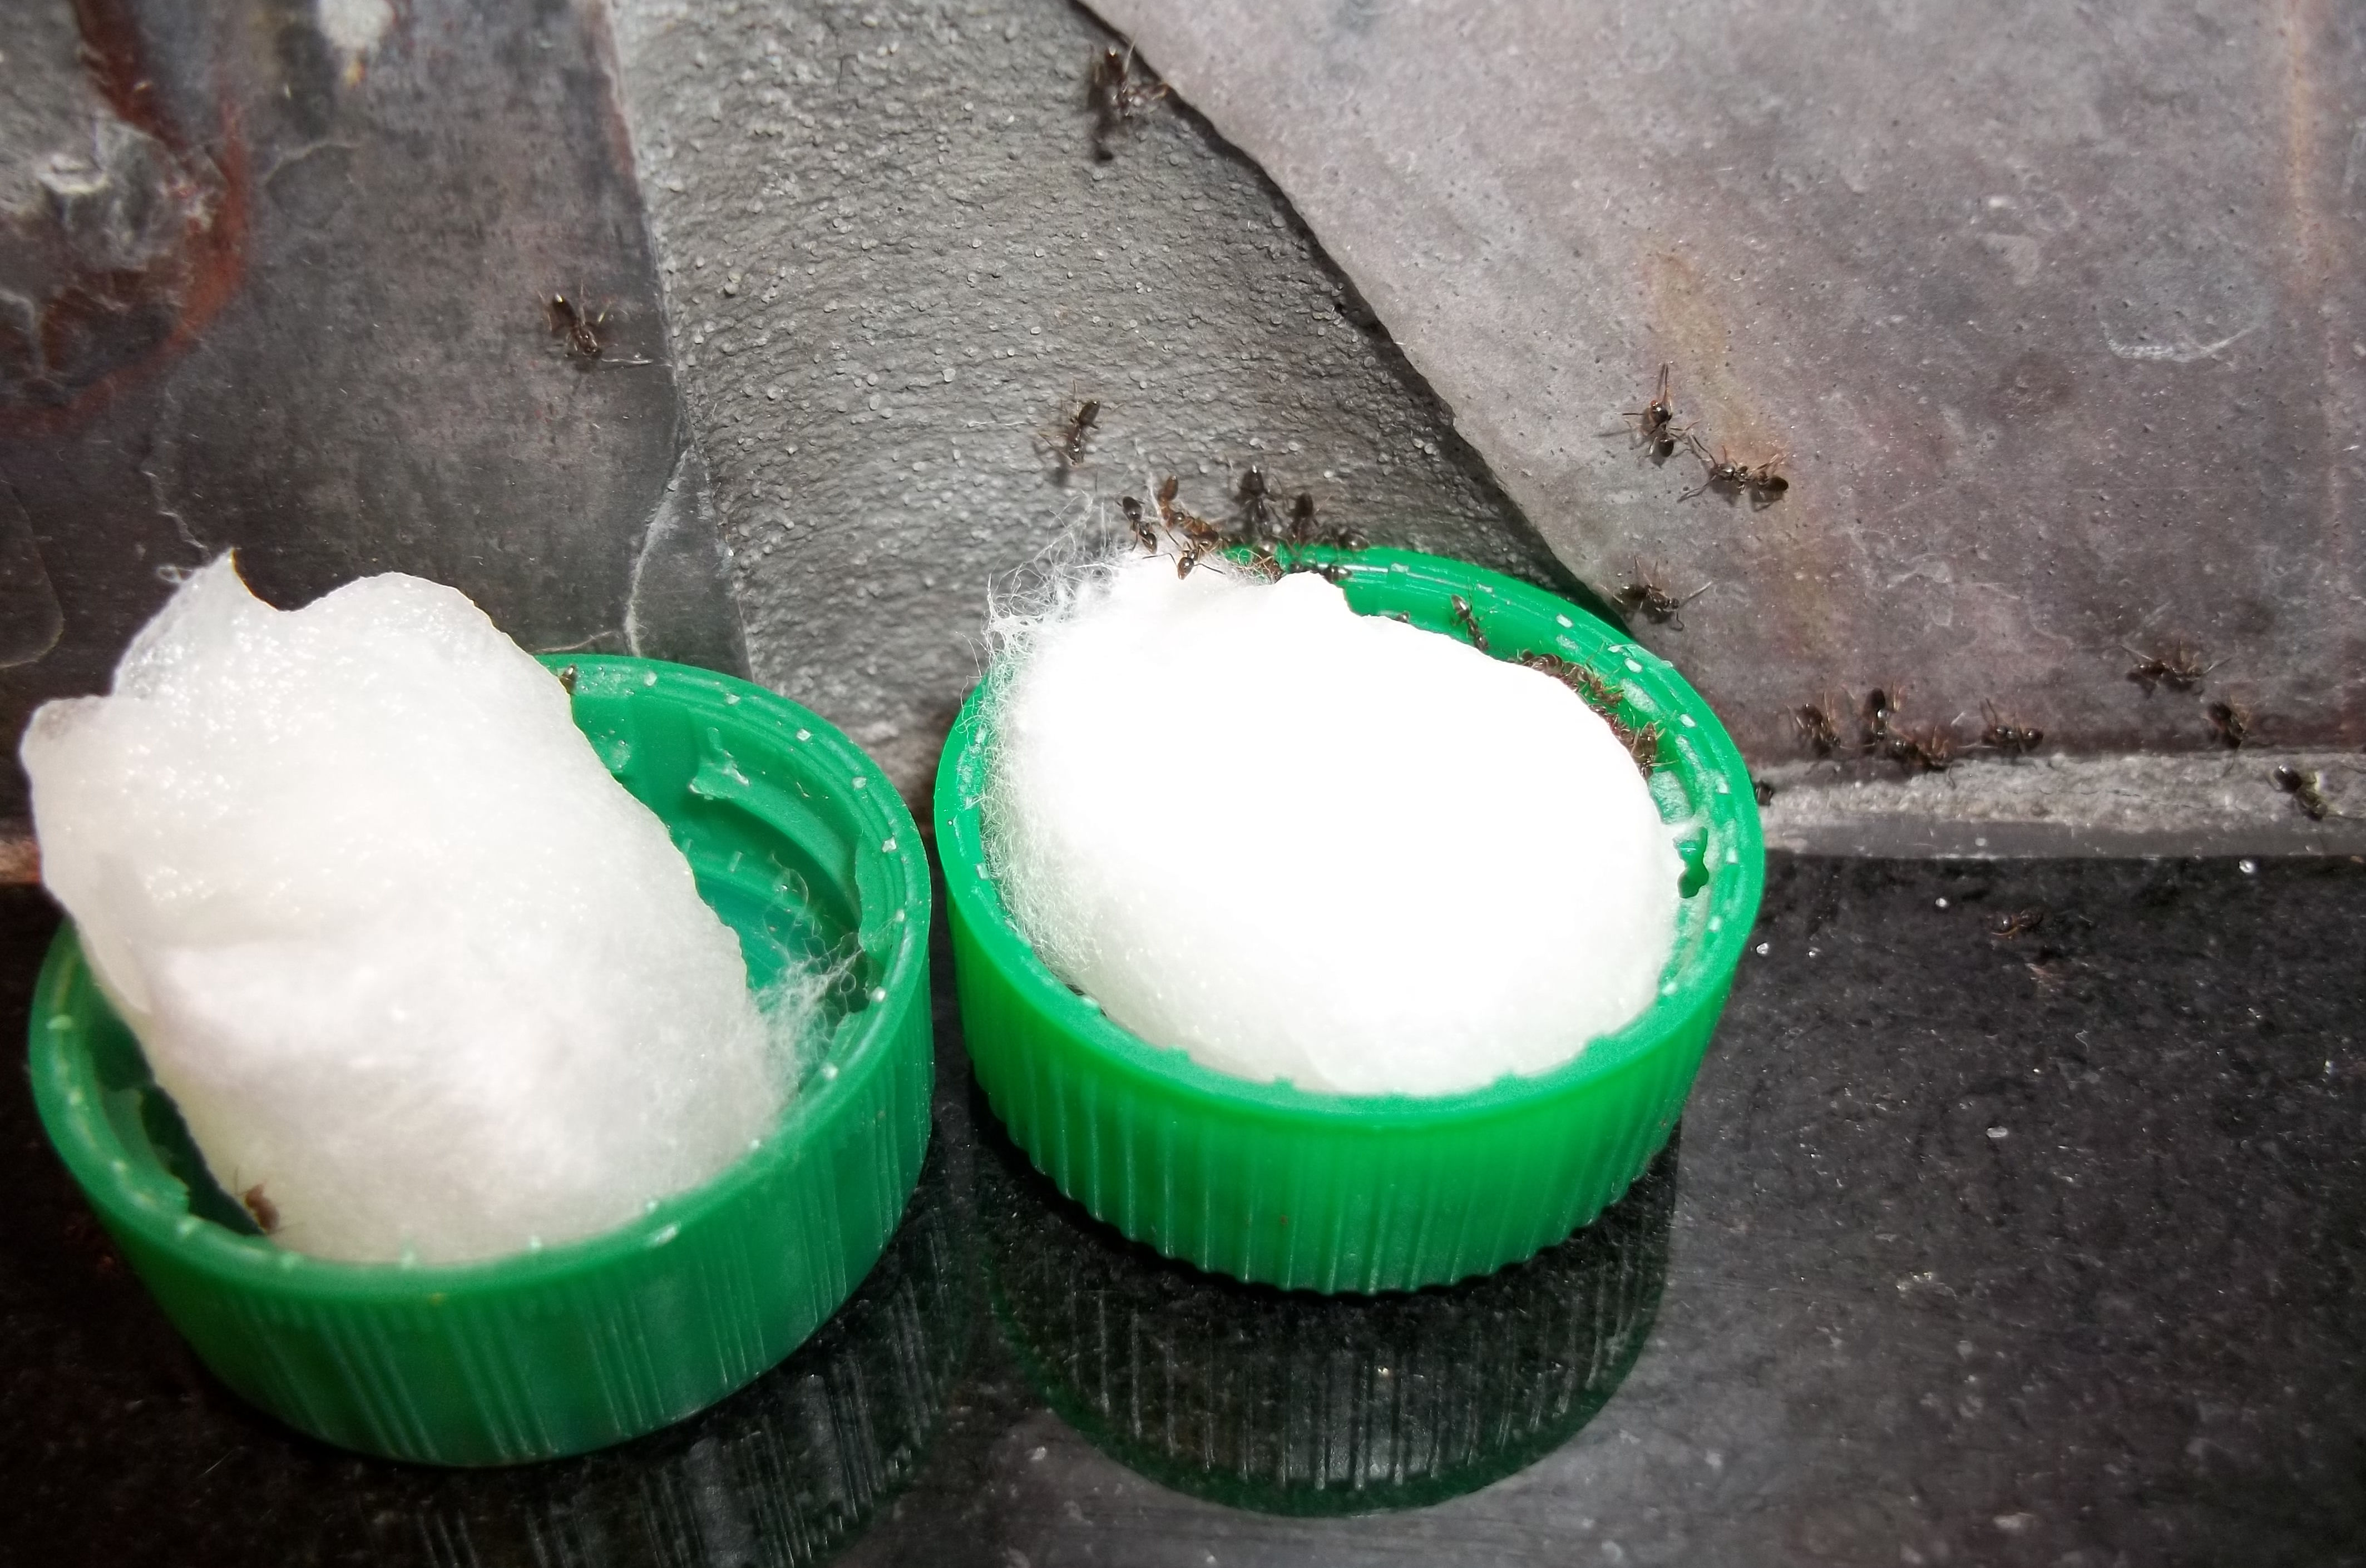
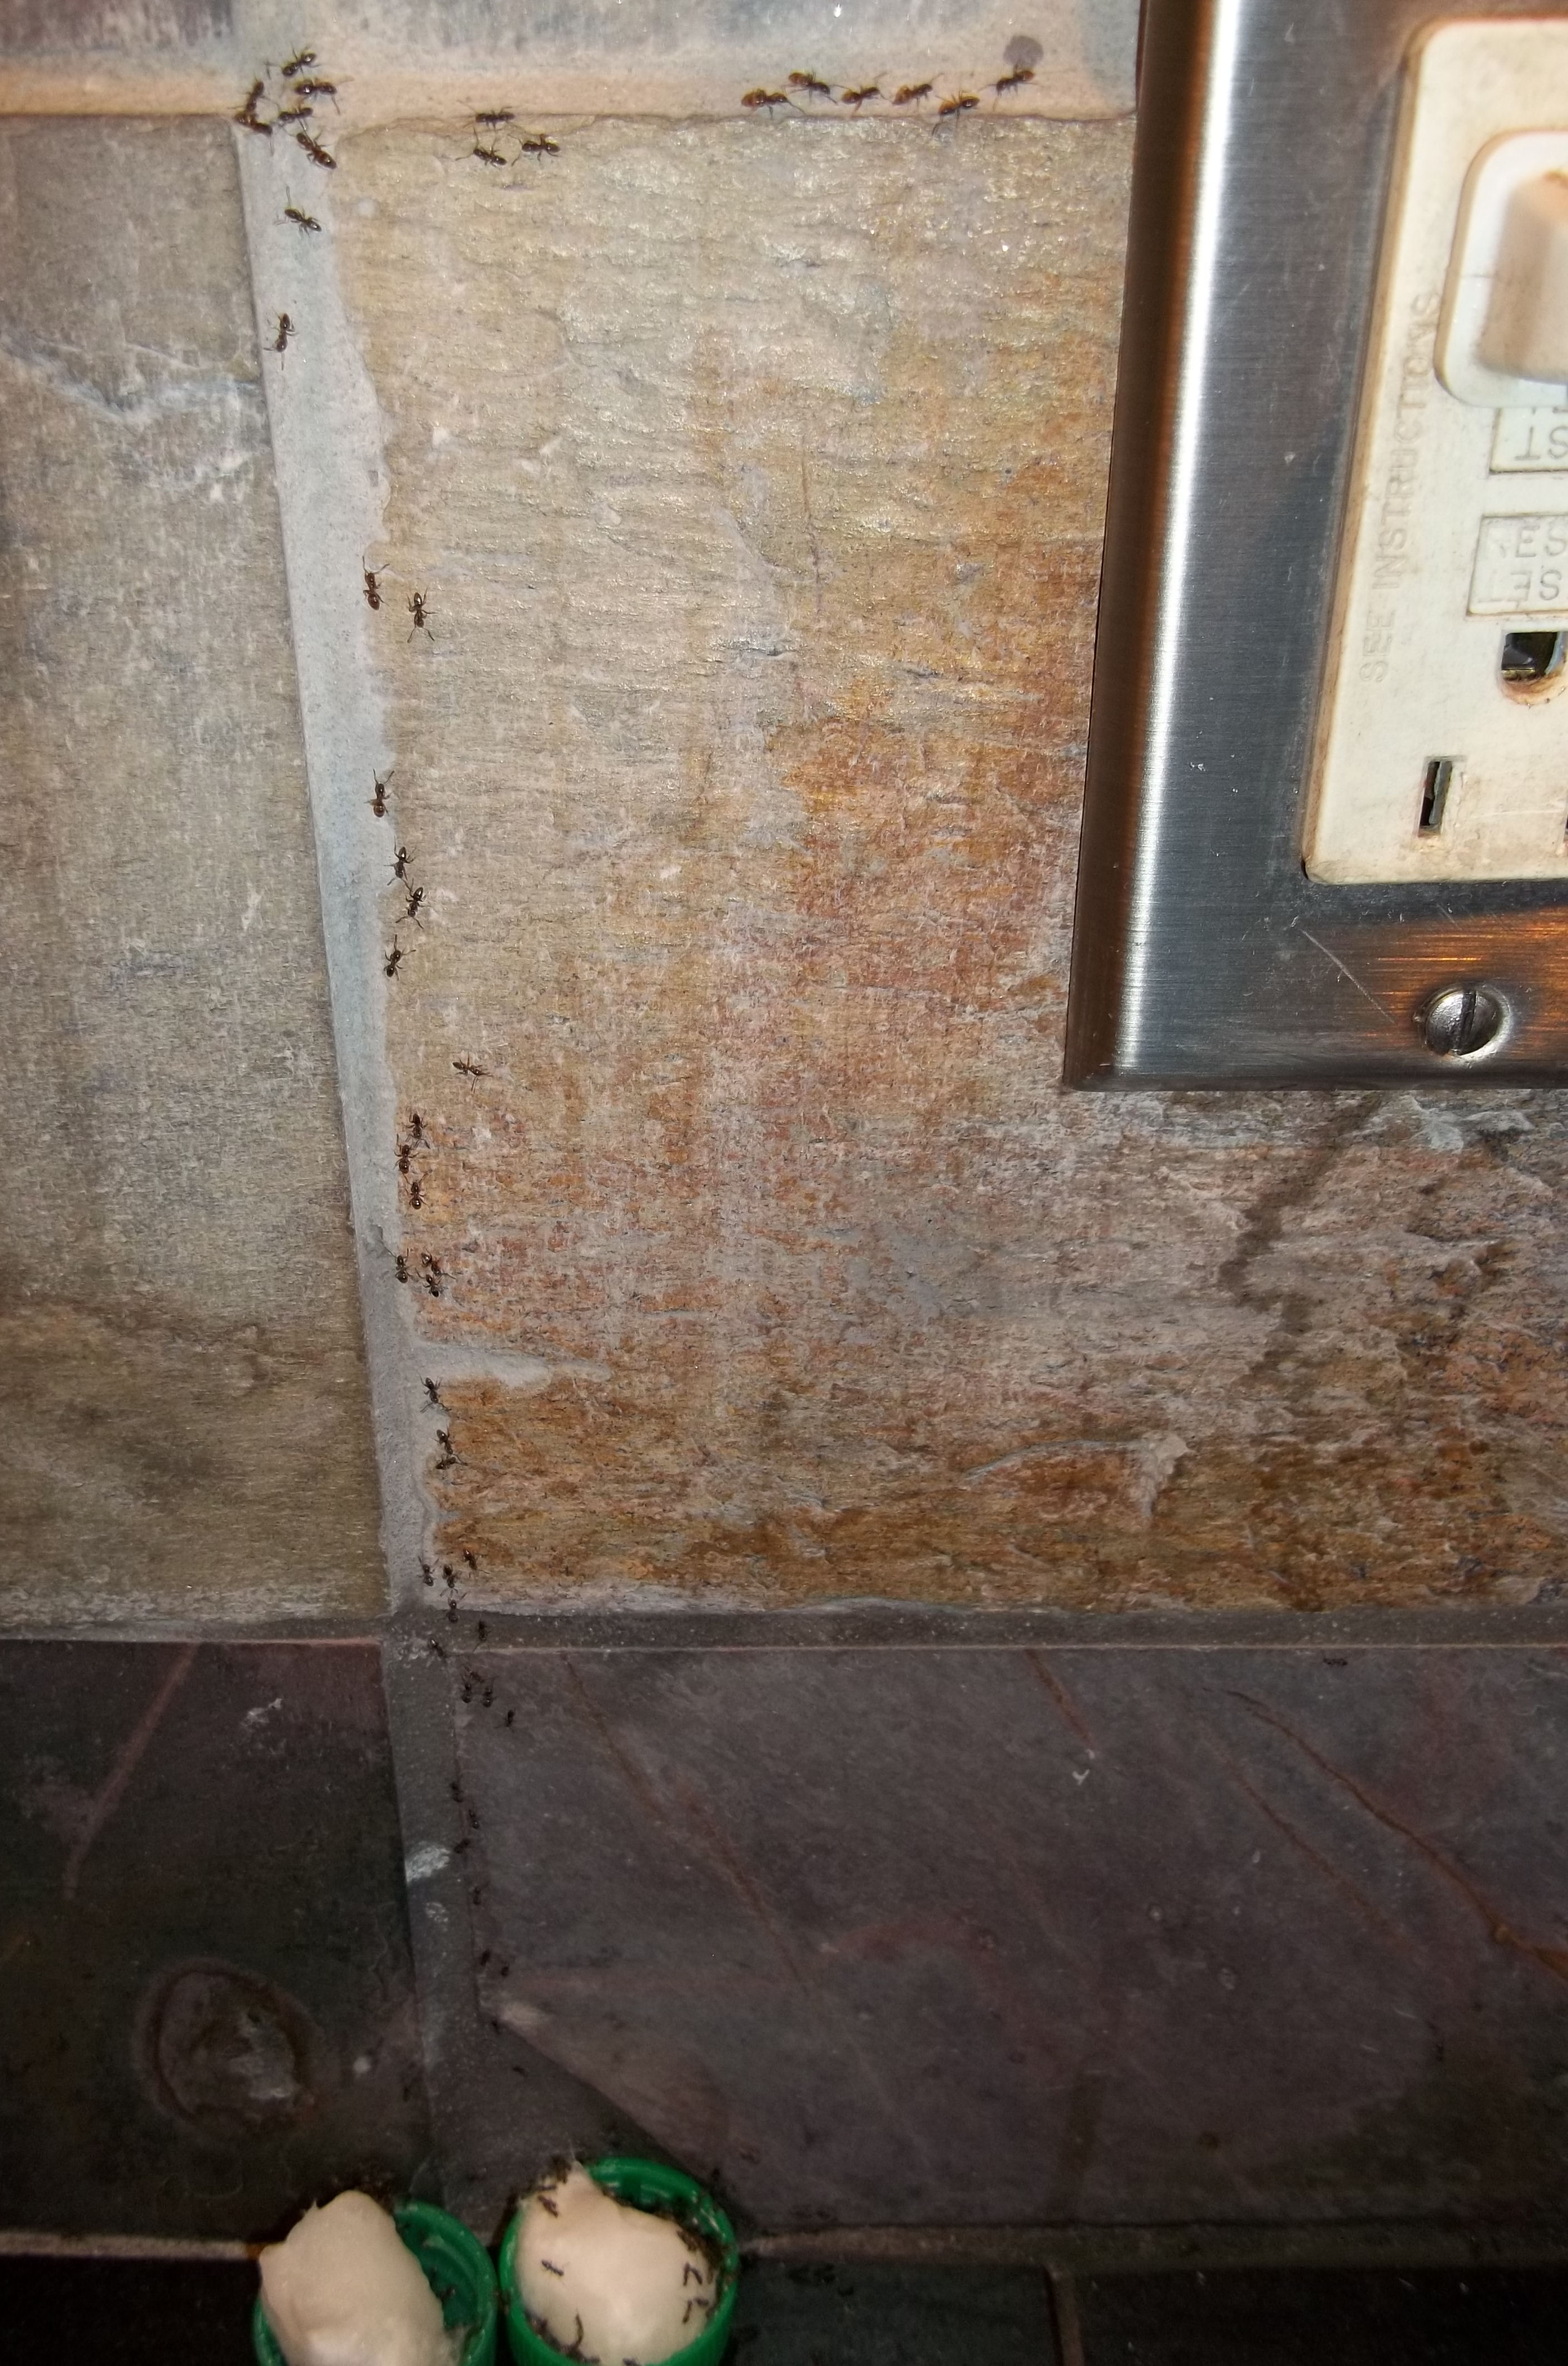
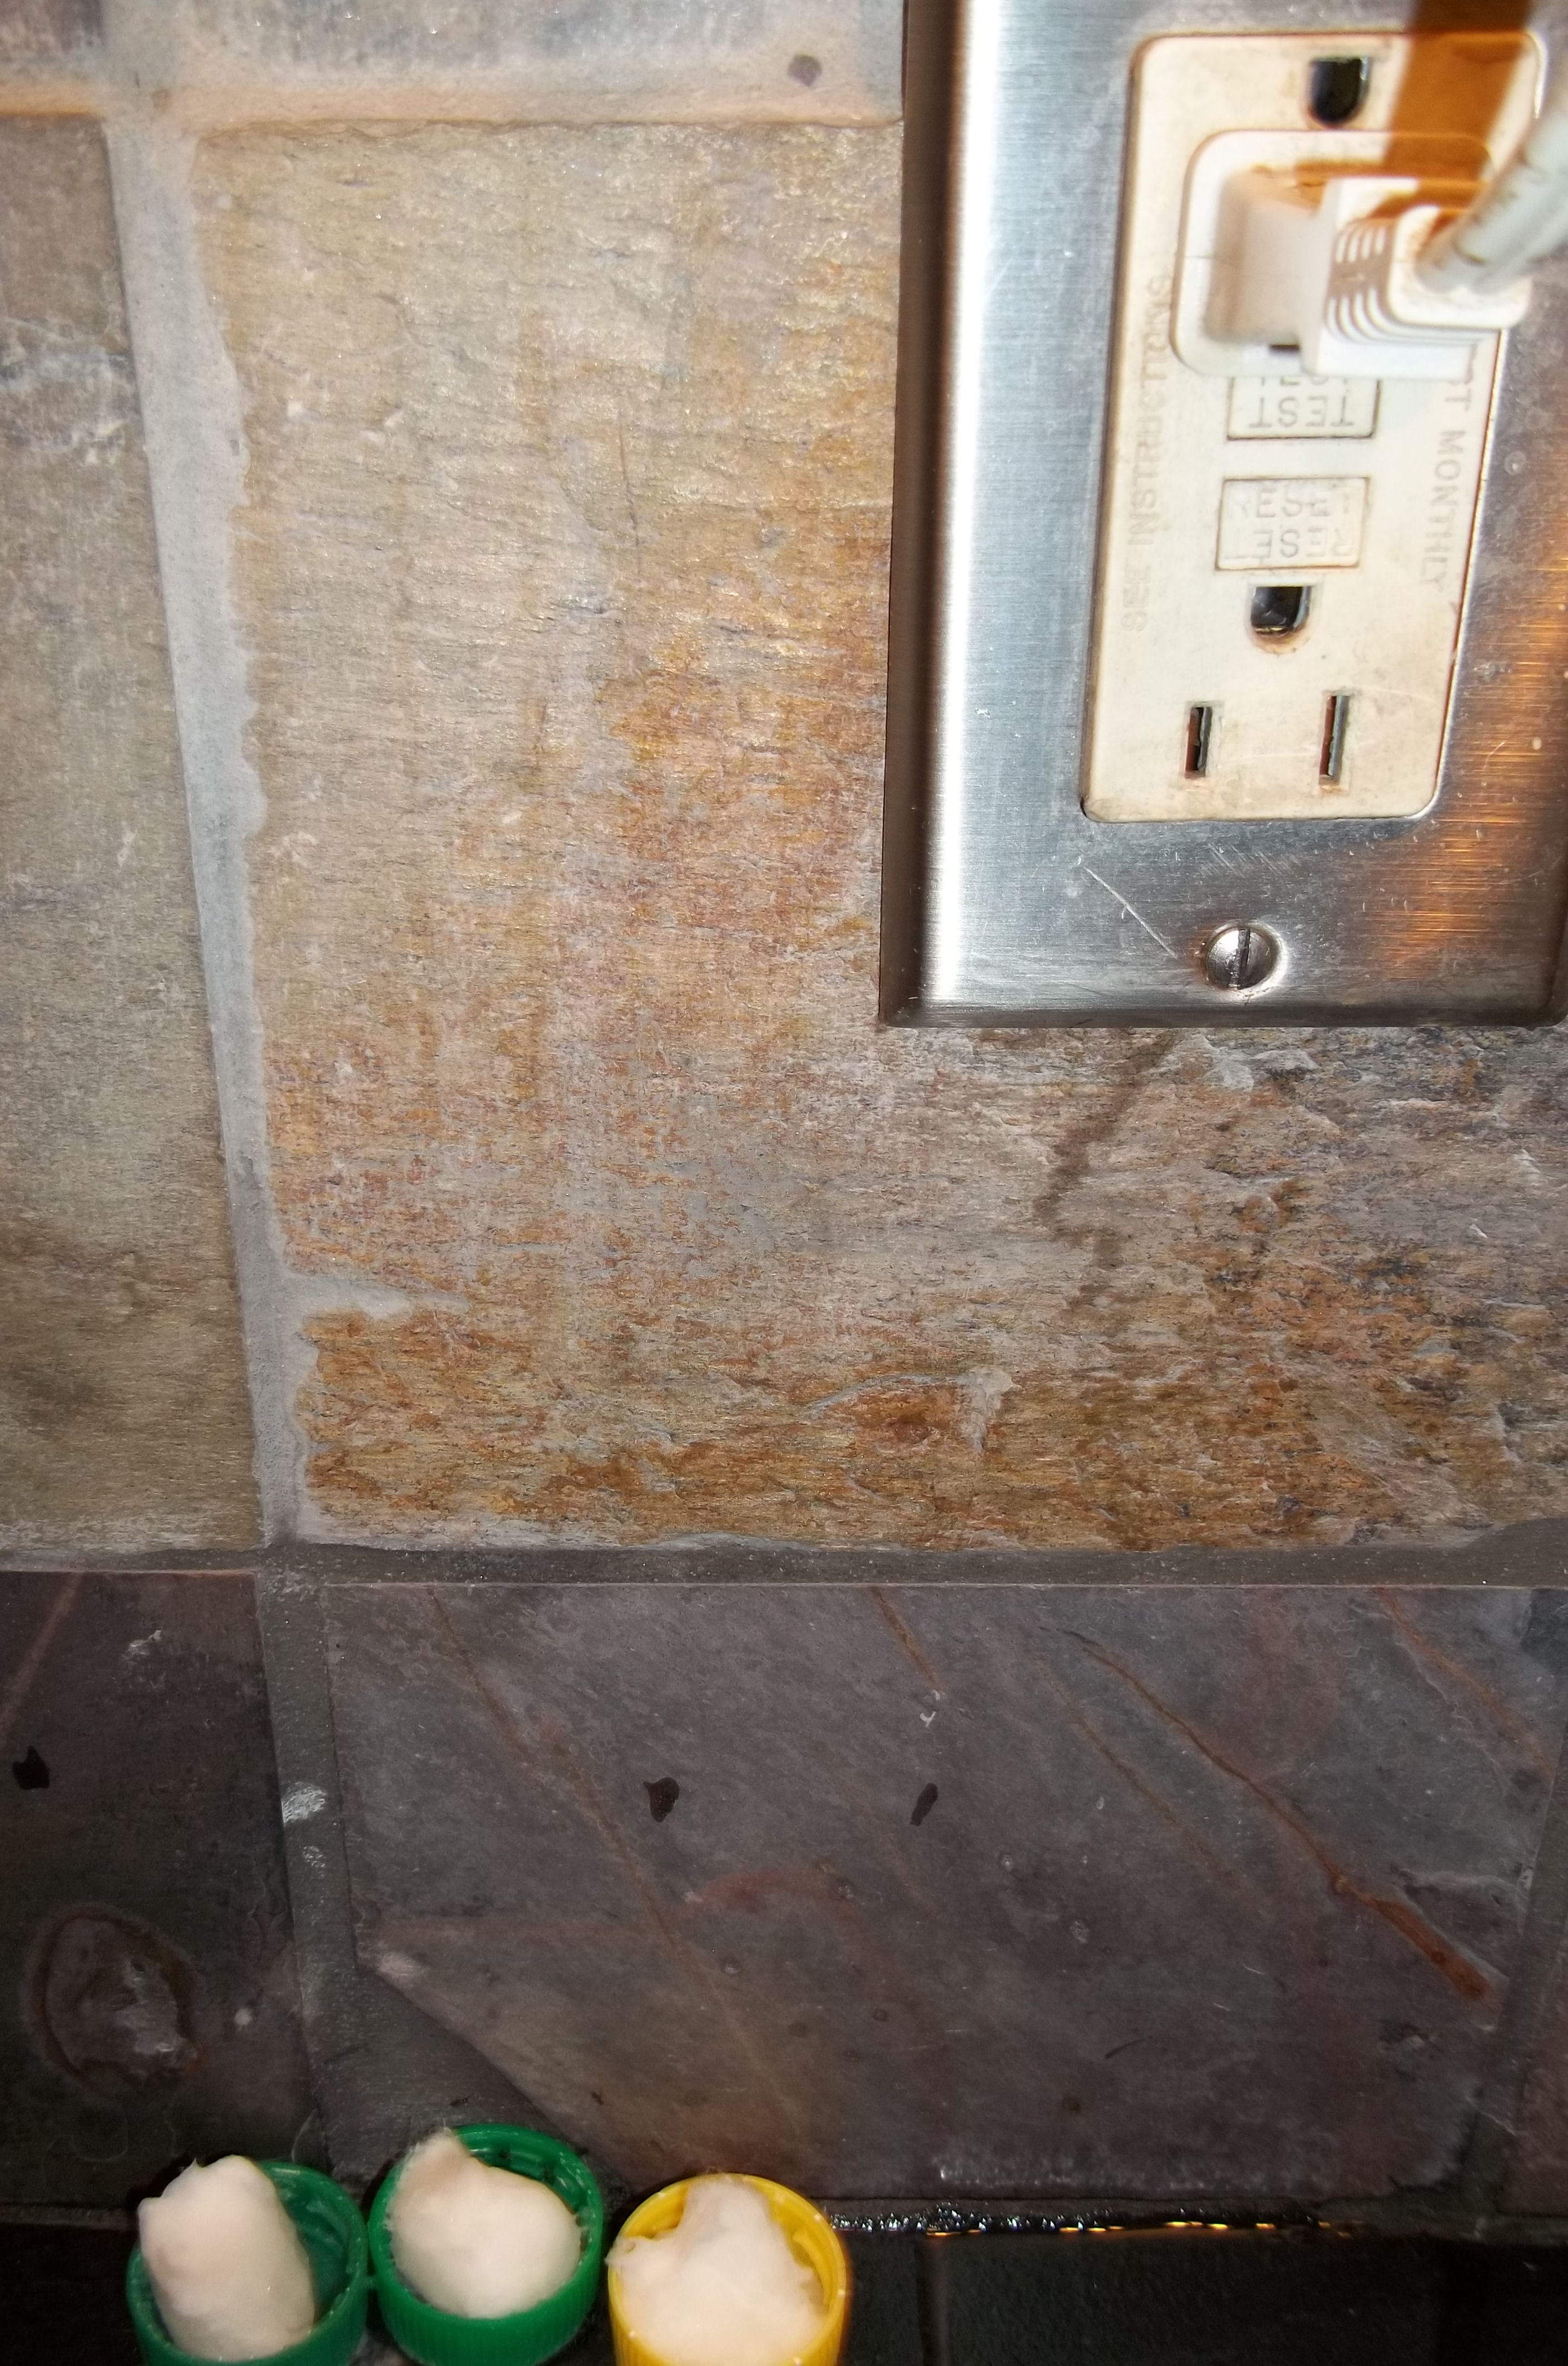
 Ding dong the ants are dead, the ants are dead, the ants are dead….okay, forgive my lapse into the Wizard of Oz, but an infestation of ants, even during good times isn’t funny. I get how important ants are in the grand scheme of things, in making the world go ‘round, but when I leave a pot of green beans on the stove and sit down, eat dinner and come back to clean up and the pot of green beans is being attacked en masse, well, Houston, we have a problem.